📊 Flowcharts
Launch the interactive flowchart builder in a new window so you can keep this guide open for reference.
What is a Flowchart?
A flowchart is a visual diagram that shows the steps in a program from start to finish. It helps you plan your robot's behavior before you write any code!
Why use flowcharts?
- Plan your program logic before coding
- See the flow of decisions and actions clearly
- Find problems in your logic early
- Communicate your ideas to teammates
- Debug programs more easily
Flowchart Shapes for VEX Programming
Square
Start/Stop Program
Rectangle
Action/Process
Up Triangle
Conditional (IF)
Down Triangle
End Conditional
Magenta Rectangle
Forever Loop
Green Rectangle
TRUE Path
Orange Rectangle
FALSE Path (ELSE)
Flowchart Examples
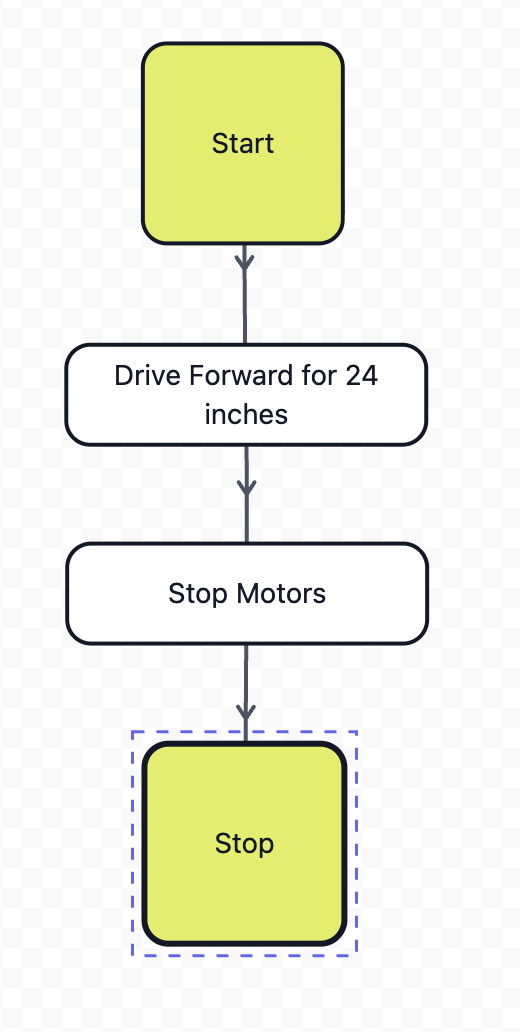
Example 1: Simple Forward Drive
Task: Robot drives forward for 3 rotations then stops.
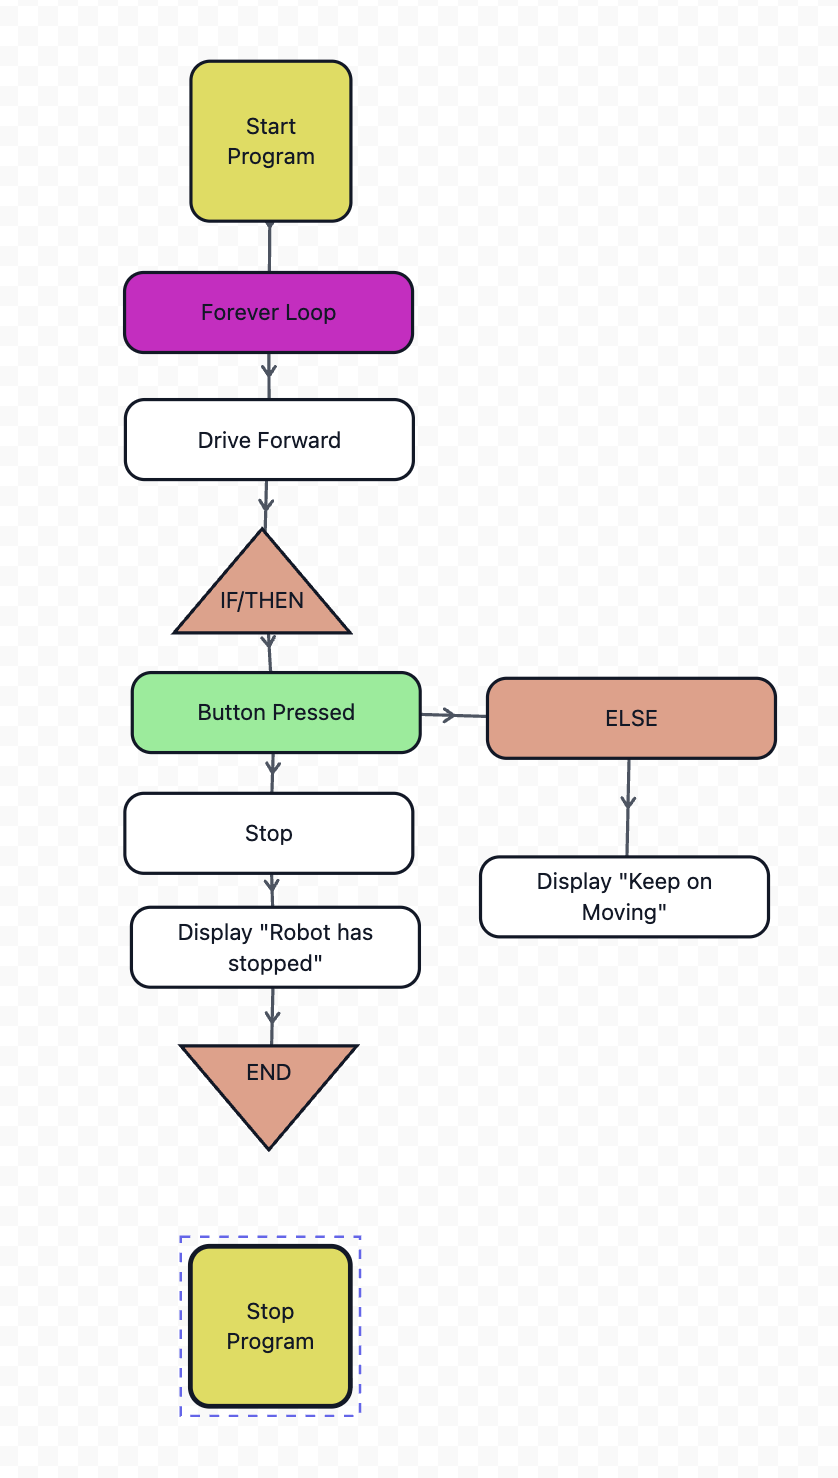
Example 2: Bumper Stop Program
Task: Drive forward until bumper is pressed, then stop.
Practice Exercise: Create Your Own Flowchart!
Challenge: Draw a flowchart for this program:
Shapes you'll need:
- 1 Green Square (START)
- 1 Blue Rectangle (Read Sensor)
- 2 Orange Up Triangles (IF conditions)
- 3 Blue Rectangles (Actions: Turn Left, Turn Right, Drive Forward)
- 1 Blue Rectangle (Stop Motors)
- 2 Purple Down Triangles (END IF)
- 1 Red Square (STOP)
Tip: Draw it on paper first! Remember to label YES/NO paths from conditionals.
- Always start with a START shape and end with a STOP shape
- Use arrows to show the direction of flow
- Label conditional branches clearly (YES/NO or TRUE/FALSE)
- Every UP triangle (IF) needs a matching DOWN triangle (END IF)
- Keep it neat and organized - easier to understand!
- Test your flowchart by following the arrows step-by-step
📊 Variables
What are Variables?
Variables are containers that store information in your program. Think of them like labeled boxes where you can keep numbers, text, or true/false values.
Types of Variables:
- Number: Stores numeric values (e.g., distance, speed, counter)
- Boolean: Stores true/false values (e.g., is robot moving?, is sensor triggered?)
- String: Stores text (e.g., "Forward", "Stopped")
Practice Example 1: Creating and Displaying a Variable
Challenge: Learn how to create a variable and display its value on the brain screen.
Step-by-step instructions:
- Open VEX V5 Code Visual Blocks
- Go to the Logic category (orange blocks)
- Click "Make a Variable" button
- Name your variable "score"
- Drag the "set [score] to [0]" block into your workspace
- Change the value from 0 to 10
- From the Events category, drag a "when started" block to the top
- From the Screen category, drag a "print [ ]" block below
- Return to the Logic category and drag the oval "score" variable block
- Place the "score" variable block into the empty slot of the "print [ ]" block
Goal: Display the value of "score" on the brain screen.
Practice Example 2: Changing Variable Values
Challenge: Create a program that changes the robot's speed by updating a variable.
Step-by-step instructions:
- Open VEX V5 Code Visual Blocks
- Go to the Logic category (orange blocks)
- Click "Make a Variable" button
- Name your variable "driveSpeed"
- From Events, drag "when started" block to workspace
- From Logic, drag "set [driveSpeed] to [0]" and change the value to 25
- From Drivetrain, drag "set drive velocity to [0] %" block
- From Logic, drag the oval "driveSpeed" variable block into the velocity slot
- From Screen, drag "print [ ]" block
- From Logic, drag the oval "driveSpeed" variable into the print block
- From Drivetrain, drag "drive [forward]" block
- From Control, drag "wait [1] seconds" and change to 3 seconds
- From Logic, drag another "set [driveSpeed] to [0]" and change value to 100
- From Drivetrain, drag another "set drive velocity to [0] %" block
- From Logic, drag the oval "driveSpeed" variable into the velocity slot
- From Screen, drag "print [ ]" block
- From Logic, drag the oval "driveSpeed" variable into the print block
Goal: The robot starts driving forward at 25% speed (showing "25" on the screen), then after 3 seconds accelerates to 100% speed (showing "100" on the screen) to demonstrate how changing a variable's value changes the robot's behavior!
🔀 Conditional Statements
What are Conditionals?
Conditional statements let your robot make decisions based on conditions. They follow the pattern: "IF this is true, THEN do this, ELSE do something else."
Block Types:
- IF-THEN: Execute code only if condition is true
- IF-THEN-ELSE: Execute one block if true, another if false
- IF-THEN-ELSE IF-THEN-ELSE: Check multiple conditions in order
- WAIT UNTIL: Pause program until a condition becomes true
- REPEAT UNTIL: Keep repeating actions until a condition becomes true
- REPEAT (x): Repeat actions a specific number of times
- FOREVER: Repeat actions continuously without stopping
- WHILE: Repeat actions as long as a condition remains true
Practice Example 1: Temperature Check
Challenge: Display different messages based on motor temperature.
Pseudocode:
Test it: Run motors for a while and see the message change.
Practice Example 2: Multi-Speed Selector
Challenge: Use IF-THEN-ELSE IF-THEN-ELSE to set different speeds based on button presses.
Logic:
Practice Example 3: Battery Level Warning
Challenge: Check battery percentage and respond appropriately.
Logic:
Practice Example 4: Count Down Timer
Challenge: Create a count down timer to lift off.
Logic:
🔗 Logic Operators
What are Logic Operators?
Logic operators combine multiple conditions to make complex decisions.
Operators:
- AND: Both conditions must be true
- OR: At least one condition must be true
- NOT: Inverts the condition (true becomes false)
Comparison Operators: = (equal), ≠ (not equal), > (greater), < (less), ≥ (greater or equal), ≤ (less or equal)
Practice Example 1: AND Operator - Safe to Move
Challenge: Robot should only move if BOTH battery is good AND temperature is OK.
Logic:
Practice Example 2: OR Operator - Emergency Stop
Challenge: Stop robot if ANY emergency condition is met.
Logic:
Practice Example 3: Complex Logic - Smart Navigation
Challenge: Combine multiple operators for intelligent behavior.
Logic:
What this does: If something is close AND you're not overriding, turn. If path is clear OR you force it, go fast. Otherwise, go slow.
Practice Example 4: Range Checker
Challenge: Check if a value is within a range.
Logic:
📏 Range Finder (Distance Sensor)
🔧 Hardware Setup
- Connect the VEX Distance Sensor to a 3-wire port (e.g., Port A, B, C, etc.)
- Ensure the sensor is firmly seated in the port
- Mount sensor facing forward on your robot
- Keep sensor lens clean for accurate readings
In VEXcode Blocks:
- Go to Devices menu
- Add device → Distance Sensor
- Name it (e.g., "FrontDistance")
- Select the 3-wire port you used
Sensor Range: Detects objects from ~20mm to 2000mm (2 meters)
How It Works
The Distance Sensor uses ultrasonic waves (sound waves) to measure how far away objects are. It sends out a sound pulse and measures how long it takes to bounce back.
Key Blocks:
Distance found by FrontDistance- Returns distance in mmIs object detected by FrontDistance- Returns true/false
Practice Example 1: Object Detection
Challenge: Stop the robot when it gets close to a wall.
Algorithm:
Skills practiced: Reading sensor values, conditionals, robot control
Practice Example 2: Variable Speed Based on Distance
Challenge: Robot slows down as it gets closer to objects.
Algorithm:
Practice Example 3: Parking Challenge
Challenge: Drive forward and stop exactly 200mm from a wall.
Algorithm:
Make it harder: Add points based on accuracy!
👁️ Vision Sensor
🔧 Hardware Setup
- Connect Vision Sensor to a Smart Port (1-21) on the V5 Brain
- Smart ports have a different connector than 3-wire ports
- Mount sensor with clear field of view
- Ensure good lighting in your environment
In VEXcode Blocks:
- Go to Devices menu
- Add device → Vision Sensor
- Name it (e.g., "Vision")
- Select the Smart Port you used
- Configure Color Signatures: Use VEX Vision Utility to teach the sensor colors
Setting Up Color Signatures
Before using the Vision Sensor, you need to "teach" it what colors to look for:
- Connect brain to computer
- Open VEX Vision Utility (in VEXcode)
- Point sensor at colored object you want to detect
- Click "Capture" to save that color as a signature (SIG_1, SIG_2, etc.)
- Give it a name like "RED_CUBE" or "GREEN_BALL"
- Download signatures to the sensor
Key Blocks:
Take snapshot with Vision.SIG_1- Look for a specific colorIs Vision detecting signature SIG_1- Returns true/falseVision largest object centerX- X position of detected objectVision largest object width- How wide the object appears
Practice Example 1: Color Detection
Setup: Configure SIG_1 for red objects
Challenge: Robot says "Found it!" when it sees a red object.
Algorithm:
Practice Example 2: Object Tracking
Setup: Configure SIG_1 for a colored object
Challenge: Robot turns to keep the object centered in view.
Algorithm:
Explanation: Vision sensor has ~316 pixels width. Center is around 158. We use 120-200 as "close enough" to center.
Practice Example 3: Multi-Color Sorting
Setup: Configure SIG_1 = RED, SIG_2 = BLUE, SIG_3 = GREEN
Challenge: Robot responds differently to each color.
Algorithm:
Practice Example 4: Object Size Detection
Challenge: Determine if object is close or far based on its size.
Algorithm:
Concept: Objects appear larger when closer to camera!
🔘 Bumper Switch
🔧 Hardware Setup
- Connect Bumper Switch to a 3-wire port (e.g., Port A, B, C, etc.)
- The switch has three wires - ensure proper orientation
- Mount on robot where it will hit obstacles first (front bumper)
- Test by pressing it manually - you should feel a click
In VEXcode Blocks:
- Go to Devices menu
- Add device → Bumper Switch
- Name it (e.g., "FrontBumper", "RearBumper")
- Select the 3-wire port you used
How It Works
A bumper switch is a simple digital sensor that's either pressed or not pressed. It's perfect for collision detection!
Key Blocks:
FrontBumper pressed- Returns true when switch is pressedFrontBumper released- Returns true when switch is not pressedWhen FrontBumper pressed- Event-based programming (advanced)
States:
- Pressed (true): Switch is pushed in
- Released (false): Switch is not pushed
Practice Example 1: Basic Collision Detection
Challenge: Stop robot when bumper hits something.
Algorithm:
Skills practiced: Reading digital sensor, wait until command
Practice Example 2: Reverse and Continue
Challenge: When robot hits wall, back up and continue.
Algorithm:
Practice Example 3: Collision Counter
Challenge: Count how many times the robot hits obstacles.
Algorithm:
Explanation: The "wasPressed" variable prevents counting the same collision multiple times.
Practice Example 4: Dual Bumper Navigation
Setup: Add FrontBumper and RearBumper to your robot
Challenge: Robot responds differently based on which bumper is hit.
Algorithm:
Practice Example 5: Bumper + Logic Operators
Challenge: Complex behavior using bumper with other conditions.
Algorithm:
Concept: After 5 collisions, robot switches to manual mode for safety!
Practice Example 6: Touch-to-Start
Challenge: Use bumper as a start button.
Algorithm: